Plan Your Weinor Awning Installation with Confidence
Why Planning Matters
Installing a Weinor awning is more than just an upgrade—it’s an investment in comfort, style, and functionality. Proper planning ensures a seamless installation, helping you avoid costly mistakes while maximising the awning’s durability and performance.
Key Steps in the Planning Process
To achieve a smooth installation, follow these essential steps:
- Assess Your Needs: Determine whether your primary goal is sun protection, weather resistance, or enhancing your outdoor aesthetics.
- Measure Your Space: Accurate measurements prevent misalignment and ensure a perfect fit.
- Choose Custom Features: Consider LED lighting, heating elements, or smart automation for added convenience.
- Evaluate Environmental Factors: Wind exposure, sun direction, and structural compatibility play a crucial role in placement.
Overcoming Common Challenges
A well-prepared installation process helps you avoid:
- Incorrect Sizing: Precise measurements prevent fitting issues.
- Structural Instability: Ensuring your mounting surface is strong enough avoids long-term damage.
- Weather-Related Setbacks: Planning around seasonal conditions ensures optimal installation timing.
Setting Realistic Expectations
Establishing a clear timeline and budget is key. Custom Weinor awnings may require lead times, and structural modifications could extend the process. By planning ahead, you ensure a hassle-free installation that enhances both function and aesthetics.
How The Outdoor Living Group Can Help
With over 20 years of expertise, The Outdoor Living Group provides tailored consultations, expert site assessments, and seamless installation services. Let us help you create the perfect outdoor space—schedule a consultation today.
What Essential Tools and Materials Are Required for Installation?
Installing a Weinor awning requires precision, the right tools, and high-quality materials to ensure durability and functionality. Proper preparation minimises installation challenges and enhances the longevity of the awning system.
Essential Tools for a Successful Installation
To achieve a secure and stable installation, the following tools are necessary:
- Measuring Tape & Level: Ensures accurate alignment and positioning.
- Power Drill & Masonry Bits: Required for secure wall or ceiling mounting.
- Adjustable Wrench & Socket Set: Essential for fastening bolts and securing brackets.
- Stud Finder: Helps locate structural support points for safe mounting.
- Ladders & Safety Harness: Ensures accessibility and safety during installation.
Recommended Materials for Durability and Performance
Selecting the right materials enhances the awning’s resilience against weather conditions:
- Powder-Coated Aluminium Brackets: Corrosion-resistant and designed for long-term stability.
- High-Tensile Fasteners & Anchors: Prevents loosening over time, especially in windy conditions.
- Weatherproof Sealant: Protects mounting points from moisture infiltration.
- UV-Resistant Awning Fabric: Ensures longevity and maintains colour vibrancy.
Tips for Sourcing and Preparing Materials
- Verify Compatibility: Ensure all components match the specific Weinor awning model.
- Check Manufacturer Recommendations: Use approved fasteners and brackets for optimal support.
- Pre-assemble Components: Organising materials beforehand streamlines the installation process.
By gathering the right tools and materials in advance, the installation process becomes more efficient, reducing potential delays and ensuring a professional-quality finish.
How to Evaluate and Prepare Your Installation Site
Key Criteria for Site Assessment
To ensure a secure and efficient installation of your Weinor awning, a thorough site evaluation is essential. Consider the following factors:
- Structural Integrity: The mounting surface must be strong enough to support the awning’s weight. Brick, concrete, and reinforced wood are ideal.
- Available Space: Measure the width and projection area to confirm the awning fits without obstruction.
- Environmental Exposure: Assess wind levels, sun direction, and potential rain runoff to determine the best positioning.
Measuring for Optimal Placement
Accurate measurements prevent misalignment and ensure a seamless fit. Follow these steps:
- Measure Width & Projection: Use a measuring tape to determine the exact dimensions required for your awning.
- Check for Obstructions: Identify any gutters, pipes, or architectural features that may interfere with installation.
- Verify Clearance: Ensure there is enough space for the awning to extend and retract without obstruction.
Addressing Structural Challenges
Some installation sites may present challenges such as uneven surfaces or weak mounting points. Solutions include:
- Reinforcement: Strengthen weak walls with additional supports or brackets.
- Custom Mounting Solutions: Use rafter brackets or ceiling mounts for non-standard surfaces.
- Wind Resistance Considerations: In high-wind areas, opt for models with enhanced stability features.
By carefully evaluating your installation site, you can optimise placement, enhance durability, and ensure a smooth installation process.
Why Choose Between Professional and DIY Installation?
Professional Installation: Expertise and Reliability
Hiring a professional installer ensures that your Weinor awning is securely and correctly fitted. Professionals bring:
- Precision and Safety: Experts assess structural integrity, ensuring the awning is mounted securely and aligned properly.
- Technical Knowledge: They handle complex installations, including electrical wiring for motorised awnings and integrating features like LED lighting or heating systems.
- Warranty and Support: Professional installation often includes warranties and post-installation services, providing long-term peace of mind.
DIY Installation: Cost Savings and Hands-On Involvement
For those with experience in home improvement projects, DIY installation can be a cost-effective option. However, it requires:
- Essential Skills: You must be proficient in measuring, drilling, securing brackets, and handling electrical components if applicable.
- Proper Tools: A power drill, level, stud finder, and safety equipment are necessary for a secure installation.
- Time and Patience: DIY installation can take longer, especially if adjustments or troubleshooting are needed.
Making the Right Choice
Consider these factors when deciding between professional and DIY installation:
- Complexity of the Project: If your installation involves structural modifications or electrical wiring, professional installation is recommended.
- Confidence in Your Skills: If you have the necessary tools and expertise, DIY installation may be a viable option.
- Long-Term Reliability: A professionally installed awning ensures durability and optimal performance.
By weighing the costs, skills, and potential risks, you can choose the installation method that best suits your needs and ensures a secure, long-lasting Weinor awning.
When Is the Best Time to Schedule Your Awning Installation?
Ideal Seasons for Installation
The best time to instal a Weinor awning is during spring or early summer when weather conditions are mild and predictable. These seasons offer:
- Stable Temperatures: Ensuring adhesives and sealants cure properly.
- Minimal Rainfall: Reducing delays and ensuring a secure installation.
- Optimal Sun Protection Timing: Preparing your outdoor space before peak summer heat.
Autumn is also a viable option, allowing you to complete the installation before winter while avoiding the high demand of spring and summer.
How Weather Conditions Affect Installation
Weather plays a crucial role in the installation process. Consider the following factors:
- Rain: Can interfere with mounting and affect adhesive bonding.
- Wind: Strong gusts make handling large awning components difficult.
- Extreme Heat: May cause expansion in materials, affecting alignment.
Checking the forecast and selecting a period with stable conditions ensures a smoother installation process.
Typical Installation Timeline
The duration of an awning installation depends on factors such as the model, mounting surface, and additional features. On average:
- Standard installations take a few hours.
- Complex setups with lighting, heating, or structural modifications may require a full day.
- Custom orders or challenging site conditions can extend the timeline further.
Coordinating with Professional Installers
To avoid scheduling conflicts, book your installation in advance, especially during peak seasons. Early planning allows for:
- Better availability of installers.
- Adequate time for site assessments and adjustments.
- Seamless coordination with other home improvement projects.
By selecting the right season, accounting for weather conditions, and planning ahead, you can ensure a hassle-free installation that maximises the longevity and performance of your Weinor awning.
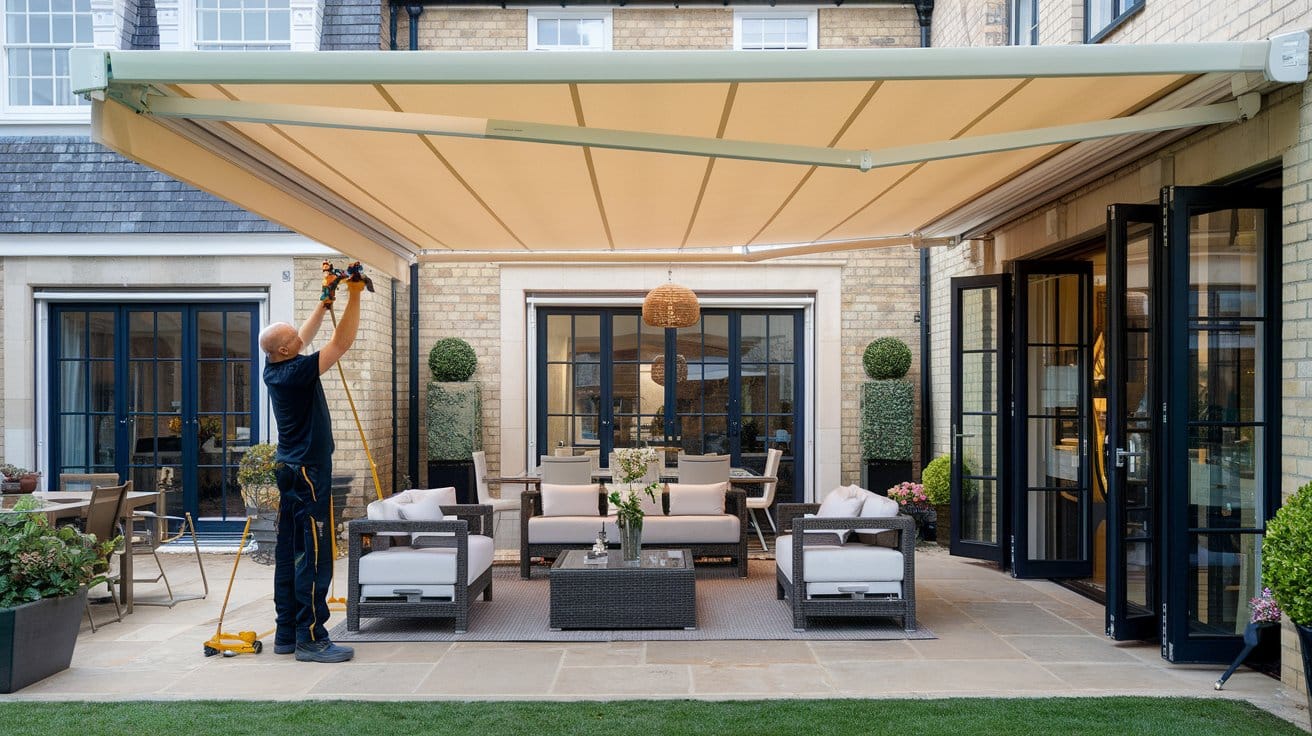
Can You Guarantee Safety Throughout the Installation Process?
Ensuring a safe installation process for a Weinor awning is essential to protect both installers and the structural integrity of the awning itself. By following best practices, using the right equipment, and adhering to safety guidelines, risks can be minimised significantly.
Key Safety Precautions
Before starting the installation, take the following precautions to prevent accidents and ensure a secure setup:
- Site Assessment: Inspect the installation area for potential hazards such as unstable surfaces, overhead obstructions, or weak mounting points.
- Weather Considerations: Avoid installing during high winds, heavy rain, or extreme temperatures, as these conditions can compromise safety.
- Secure Work Area: Keep the workspace clear of unnecessary tools or obstacles to reduce the risk of tripping or falling.
Securing the Awning to Prevent Accidents
Proper anchoring is crucial to ensure the awning remains stable over time. This involves:
- Using High-Tensile Fasteners: Secure brackets and mounting points with durable, weather-resistant fasteners.
- Checking Structural Integrity: Ensure the mounting surface—whether a wall, ceiling, or rafter—can support the weight and wind load of the awning.
- Aligning Components Correctly: Misaligned brackets or loose fittings can lead to instability, so double-check all connections before finalising the installation.
Recommended Protective Gear
Installers should wear:
- Safety Gloves: To prevent cuts and abrasions.
- Protective Eyewear: Shields against dust and debris.
- Harness and Non-Slip Footwear: Essential for working at heights and maintaining stability on ladders.
By following these safety measures, the installation process becomes more efficient and secure, ensuring both the longevity of the awning and the well-being of those involved.
What Are the Essential Maintenance Steps After Installation?
A Weinor awning is an investment in comfort and style, and regular maintenance ensures it remains in peak condition for years to come. By following a structured care routine, you can prevent wear and tear while maintaining its functionality and aesthetic appeal.
Routine Maintenance Tasks
Regular maintenance involves inspecting the awning for signs of damage, cleaning the fabric, and ensuring all mechanical components function smoothly. Key tasks include:
- Visual Inspection: Check for loose bolts, misaligned brackets, or fabric tension issues.
- Lubrication: Apply a silicone-based lubricant to moving parts to prevent stiffness.
- Operational Testing: Extend and retract the awning periodically to ensure smooth movement.
Cleaning and Caring for the Awning Fabric
Dirt, dust, and environmental pollutants can accumulate over time, affecting the fabric’s durability. To keep it in pristine condition:
- Use Mild Soap and Water: Avoid harsh chemicals that may degrade the fabric’s protective coating.
- Soft Brush Cleaning: Gently remove debris and stains without damaging the material.
- Allow Complete Drying: Ensure the awning is fully dry before retracting to prevent mould and mildew.
Signs That an Awning Needs Repair or Replacement
Over time, certain indicators suggest that repairs or replacements may be necessary:
- Fabric Fading or Tearing: Prolonged exposure to UV rays can weaken the material.
- Difficulty in Operation: If the awning struggles to extend or retract, mechanical components may need adjustment.
- Bracket or Frame Damage: Rust or structural weakening can compromise stability.
Extending the Lifespan of Your Awning
By performing regular maintenance, addressing minor issues promptly, and protecting the awning from extreme weather conditions, you can significantly extend its lifespan, ensuring long-term performance and reliability.
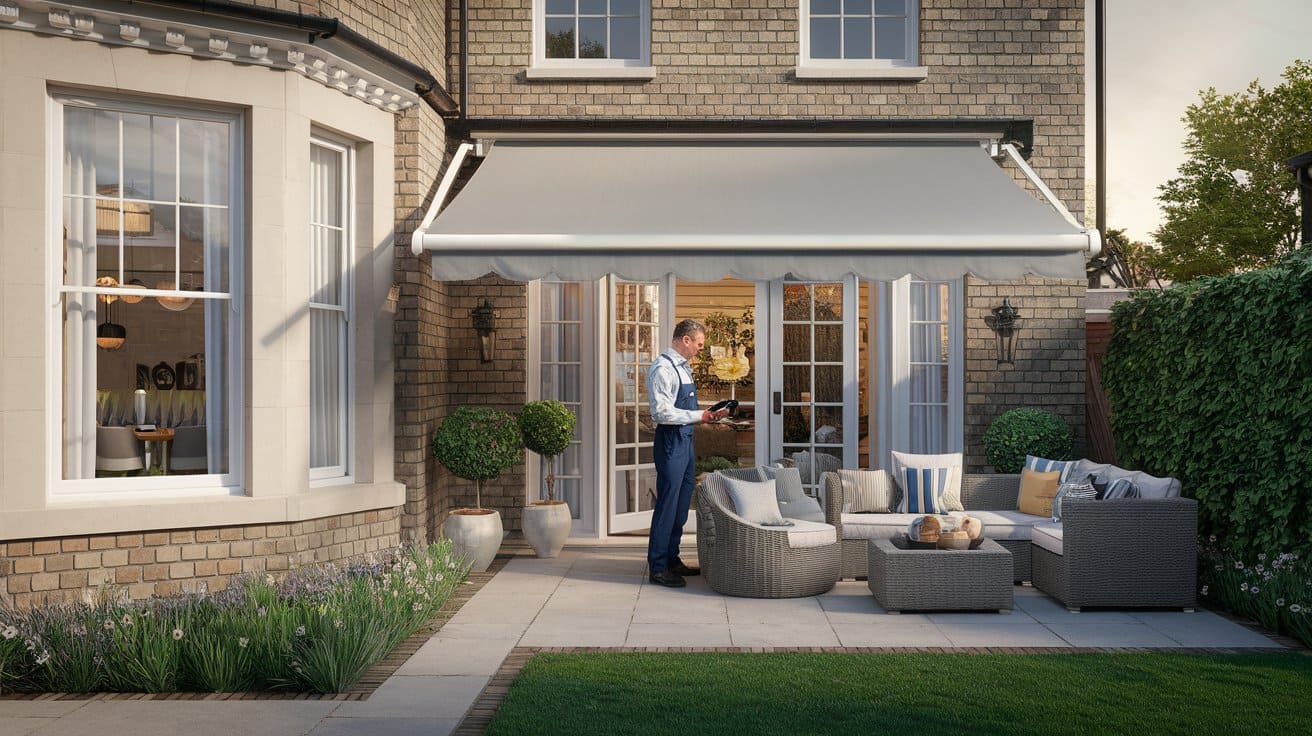
Contact The Outdoor Living Group Today
Expert Guidance for Your Weinor Awning Installation
At The Outdoor Living Group, we specialise in transforming outdoor spaces with precision-engineered Weinor awnings. With over 20 years of experience, our team ensures that every installation is seamless, durable, and tailored to your unique requirements. Whether you need a patio awning, pergola system, or vertical shading solution, we provide expert consultation and installation services to bring your vision to life.
Comprehensive Services for Weinor Awnings
We offer a full spectrum of services to support your awning installation, including:
- Personalised Consultation: Our experts assess your space, discuss your needs, and recommend the best Weinor awning model for your property.
- Custom Design Solutions: Choose from a wide range of fabric patterns, frame colours, and optional features like LED lighting and heating systems.
- Professional Installation: Our skilled technicians ensure precise fitting, secure mounting, and optimal functionality for long-term performance.
- Post-Installation Support: We provide maintenance advice, warranty assistance, and ongoing service to keep your awning in top condition.
Schedule Your Consultation Today
Planning your awning installation starts with a conversation. Our team is ready to guide you through the process, ensuring that your outdoor space is enhanced with a stylish, weather-resistant Weinor awning. Contact us today to schedule a consultation and take the first step toward a beautifully shaded outdoor area.
FAQ’s
What Tools and Techniques Ensure Accurate Measurements?
The Importance of Precision
Accurate measurements are the foundation of a successful Weinor awning installation. A minor miscalculation can lead to misalignment, operational inefficiencies, or structural instability. Ensuring precise measurements guarantees a seamless fit, optimal performance, and long-term durability.
Essential Tools for Accurate Measurement
To achieve precise measurements, the following tools are indispensable:
- Laser Distance Measurer: Provides quick, highly accurate readings, reducing human error.
- Measuring Tape: A high-quality, retractable tape measure ensures exact width and projection calculations.
- Spirit Level: Confirms that the mounting surface is even, preventing misalignment.
- Plumb Line or Laser Level: Ensures vertical alignment when marking installation points.
- Marking Pencil or Chalk Line: Creates clear, visible reference points on the mounting surface.
Common Measurement Pitfalls and How to Avoid Them
- Overlooking Structural Obstacles: Be mindful of gutters, downspouts, or architectural features that could interfere with the awning’s extension.
- Relying on a Single Measurement: Always measure at least twice to confirm accuracy and consistency.
- Failing to Account for Pitch and Clearance: Ensure there is adequate space for the awning to extend fully without obstruction.
Verifying Measurements Against Awning Specifications
Before installation, cross-check your measurements with the manufacturer’s specifications. Consider additional space requirements for brackets, motorised components, or optional features like LED lighting and heating systems.
By meticulously measuring and validating dimensions, you can ensure a flawless installation, maximising both the functionality and aesthetic appeal of your Weinor awning.
How to Budget for Your Awning Installation Project
Comparing Professional vs. DIY Installation Costs
The cost of installing a Weinor awning varies significantly depending on whether you opt for professional installation or take the DIY route. Professional installation typically ranges from £1,000 to £3,500, depending on the complexity of the project, structural modifications, and additional features like LED lighting or heating systems. This cost includes expert fitting, warranty coverage, and post-installation support.
DIY installation, on the other hand, can reduce expenses by eliminating labour costs, but it requires purchasing or renting specialised tools such as drills, stud finders, and safety equipment. While the upfront savings may seem appealing, improper installation can lead to costly repairs or replacements in the long run.
Factors Influencing Installation Costs
Several elements impact the overall cost of installing a Weinor awning:
- Awning Type & Size: Larger awnings or models with advanced features (e.g., motorised operation, integrated lighting) tend to be more expensive.
- Mounting Surface: Installing on brick or concrete may require additional reinforcement, increasing labour and material costs.
- Customization: Choosing bespoke frame colours, premium fabrics, or smart home integration can add to the final price.
- Permit & Compliance Fees: Some local regulations may require permits, adding administrative costs to the project.
Hidden Costs to Consider
Beyond the base installation cost, homeowners should account for potential hidden expenses, including:
- Structural Modifications: Reinforcing weak walls or adding support brackets.
- Electrical Work: Wiring for motorised awnings or heating elements.
- Maintenance & Repairs: Long-term upkeep to ensure durability.
Smart Budgeting Tips
To manage costs effectively, obtain multiple quotes, prioritise essential features, and plan for any unforeseen expenses. Investing in quality installation ensures long-term performance and minimises future repair costs.
What Factors Affect the Installation Timeline?
Average Installation Time for a Weinor Awning
The time required to instal a Weinor awning varies depending on the model, mounting surface, and additional features. A standard installation typically takes between 4 to 8 hours, while more complex setups—such as those involving motorised operation, integrated LED lighting, or heating systems—may extend to a full day.
Impact of Different Installation Methods
- Wall-Mounted Awnings: These are generally quicker to instal, provided the surface is structurally sound.
- Ceiling or Rafter-Mounted Awnings: Require additional reinforcement, increasing installation time.
- Pergola Awnings & Louvre Roofs: More intricate structures like the Plaza Viva or Artares demand precise alignment and may take longer.
Factors That Can Cause Delays
Several elements can impact the installation schedule:
- Weather Conditions: Strong winds, rain, or extreme temperatures can halt progress.
- Structural Adjustments: If the mounting surface requires reinforcement, additional time is needed.
- Custom Features: Integrating smart home controls, lighting, or heating systems adds complexity.
- Permit Requirements: Some properties may need approval before installation can proceed.
Ensuring a Smooth Installation
To keep the project on track:
- Plan Ahead: Schedule installation during favourable weather conditions.
- Prepare the Site: Clear the area and ensure easy access for installers.
- Verify Measurements: Double-check dimensions to prevent last-minute adjustments.
By considering these factors, you can streamline the installation process and enjoy your Weinor awning without unnecessary delays.
How Does a Weinor Awning Enhance Your Outdoor Space?
Transforming Outdoor Living
A Weinor awning extends your outdoor space, creating a comfortable and stylish retreat. By providing adjustable shade, it allows you to enjoy your patio, balcony, or garden in various weather conditions. Whether shielding against intense sunlight or offering light rain protection, it ensures a pleasant outdoor experience without compromising on fresh air and natural light.
Innovative Features That Set Weinor Awnings Apart
Weinor awnings stand out due to their advanced engineering and premium materials. Key features include:
- UV-Resistant Fabrics: Protect against harmful sun exposure while maintaining vibrant colours.
- Integrated LED Lighting & Heating Systems: Extend usability into the evening and cooler months.
- WindLock Safety Device: Ensures stability in breezy conditions.
- Smart Home Integration: Motorised models offer effortless control via remote or smartphone.
Energy Efficiency & Climate Control
A Weinor awning contributes to energy efficiency by reducing indoor temperatures. By blocking direct sunlight, it minimises heat buildup, lowering reliance on air conditioning and cutting energy costs. Some models even feature solar-powered automation, enhancing sustainability.
Enhancing Property Value
A well-installed Weinor awning adds both functional and aesthetic value to a property. Its sleek design complements modern and traditional architecture, creating an inviting outdoor extension. Prospective buyers appreciate the added comfort and energy savings, making it a desirable feature that can increase resale value.
By combining durability, innovation, and style, a Weinor awning enhances outdoor living while offering long-term benefits in comfort, efficiency, and property appeal.
What Skills and Resources Are Needed for DIY Installation?
Essential Skills for a Successful Installation
Installing a Weinor awning requires a combination of technical ability, precision, and problem-solving skills. Key competencies include:
- Measurement Accuracy: Ensuring precise dimensions to prevent misalignment.
- Structural Assessment: Evaluating the mounting surface for stability and load-bearing capacity.
- Drilling & Fastening Expertise: Properly securing brackets to different surfaces such as brick, concrete, or wood.
- Basic Electrical Knowledge (if motorised): Safely wiring and integrating automation features.
Prioritising Safety During Installation
Handling large components and working at heights necessitate strict safety measures:
- Use of Proper Equipment: A sturdy ladder, safety harness, and protective gloves reduce risks.
- Weather Awareness: Avoid installing in strong winds or rain to ensure stability.
- Secure Fastening: High-tensile fasteners and reinforced brackets prevent structural failure.
Resources to Assist with DIY Installation
To streamline the process, various resources can provide guidance:
- Manufacturer’s Installation Manual: Step-by-step instructions tailored to the specific awning model.
- Online Tutorials & Guides: Visual demonstrations for best practices.
- Specialised Tools: A power drill, stud finder, level, and torque wrench are essential for precision.
- Technical Support: Some manufacturers offer customer service for troubleshooting.
Is DIY Installation the Right Choice?
Before committing to a DIY approach, consider:
- Experience Level: If you lack familiarity with power tools or structural assessments, professional installation may be preferable.
- Time Commitment: DIY installation can take longer, especially for first-timers.
- Long-Term Performance: A professionally installed awning ensures optimal functionality and warranty protection.
By evaluating these factors, you can determine whether DIY installation aligns with your skills and resources.
What Are the Key Maintenance Tasks for Longevity?
A Weinor awning is a valuable addition to any outdoor space, offering shade, comfort, and style. To ensure it remains in optimal condition for years, regular maintenance is essential. By following a structured care routine, you can prevent premature wear and maintain its functionality.
Routine Maintenance for Long-Term Performance
- Inspect for Structural Integrity: Periodically check the frame, brackets, and fasteners for any signs of loosening or corrosion. Tighten bolts and replace any worn components as needed.
- Ensure Smooth Operation: Extend and retract the awning occasionally to confirm that the mechanism functions without resistance. If movement becomes stiff, adjustments may be required.
- Lubricate Moving Parts: Apply a silicone-based lubricant to hinges and joints to keep them operating smoothly and prevent squeaking.
Cleaning Techniques to Preserve Fabric Quality
- Use Gentle Cleaning Methods: A mild soap solution and a soft brush effectively remove dirt and debris without compromising the fabric’s protective coating.
- Rinse and Dry Thoroughly: After cleaning, rinse with clean water and allow the awning to dry completely before retracting to prevent mould and mildew.
- Protect Against Stains and Pollutants: Regularly brush off dust and organic matter, such as leaves and bird droppings, to prevent staining and fabric degradation.
Identifying Signs That Require Attention
- Fabric Wear and Discoloration: Fading or thinning fabric may indicate prolonged UV exposure and could necessitate replacement.
- Operational Difficulties: If the awning hesitates or struggles to extend, the motor or mechanical components may need servicing.
- Frame Stability Issues: Any bending, rusting, or misalignment in the frame should be addressed promptly to maintain safety and durability.
Preventing Common Issues
By keeping the awning clean, addressing minor concerns early, and avoiding exposure to extreme weather conditions when possible, you can significantly extend its lifespan. A proactive maintenance approach ensures continued performance and aesthetic appeal for years to come.